


Western Blot Experiment
- 2026-07-09
- 255
I. Principles of the Western Blot Assay
SDS-PAGE is used to directly separate protein and peptide samples by electrophoresis. The peptides and proteins are then transferred and adsorbed onto the surface of a solid-phase carrier (such as a nitrocellulose membrane) via noncovalent bonds, while preserving the types and biological activities of the electrophoretically separated peptides and proteins. The protein/peptide fragments immobilized on the solid-phase carrier serve as carrier antigens, which undergo an immune reaction with the corresponding antibodies. Subsequently, a secondary antibody labeled with a radioactive isotope binds to the antigens on the carrier. The target protein can then be isolated using techniques such as fluorescence absorption colorimetry or fluorescent radioisotope autoradiography.
II. Western Blot Experimental Procedure
(1) Gel Preparation: Prepare the separation stock gel by mixing 4.0 mL of ddH₂O, 3.3 mL of 30% stock gel, 2.5 mL of 1.5 M Tris-HCl, 0.1 mL of 10% SDS, and 0.1 mL of 10% APS gel. Combine the two mixtures described above, add 10 μL of TEMED (N'N'N'N'-tetramethylethylenediamine) to seal the bottom, then add another 4 μL of TEMED. Mix thoroughly and pour into a glass plate well. Add approximately 20% ethanol to seal the top, taking care not to allow the liquid surface on the glass to become completely flat. Prepare the concentrated gel mixture: 1.4 mL of ddH₂O, 0.33 mL of 30% gel stock, 0.25 mL of 1 M Tris-HCl, 0.02 mL of 10% SDS, 0.02 mL of 10% APS, and 2 μL of TEMED. Pour out any residual gel solution remaining on the inner walls of the separation gel cup, add the remaining gel mixture described above, and immediately and gently insert the comb into the channels of the glass plate. After complete polymerization, allow the sample to stand for approximately 15–30 minutes. When inserting and removing the comb, take care to prevent large amounts of air bubbles or liquid from flowing directly into the comb holes, which could cause the entire comb to deform.
(II) Sample Preparation
1. Cultured Cells (Qualitative)
After removing the cells from the culture medium, immediately rinse each cell 2 to 3 times with warm PBS (cold PBS may cause the cells to detach). For a 6-well plate, add 200 to 300 μL of loading buffer (heated to 60–80°C) to each well. The scraped-off cells must first be boiled in an Eppendorf tube for about 10 minutes, during which time the tube must be vortexed 2 to 3 times. Use a final, thoroughly cleaned needle tip to pick up the filaments again, discarding all clumps. If you find that no filamentous clumps are present but the filaments still exhibit noticeable stringiness, consider placing the Eppendorf tube at 0°C, then centrifuging and shaking at 14,000 to 16,000 g for about 2 minutes before picking up the filaments again. If there are no obvious stringy clumps in the sample, or if there are no obvious white stringy clumps but the sample solution remains somewhat viscous, you can first use a 1 mL syringe to perform repeated suction tests to appropriately reduce the viscosity of the sample solution, facilitating the next loading. Wait until the sample solution has gradually stabilized and the sample temperature has returned to just below normal room temperature before loading again.
2. Cultured Cells (Quantification)
Add an appropriate amount of ice-pre-cooled lysis buffer, mix well, and place on ice for 10–20 minutes. Scrape off the detached cell supernatant, collect it in an Eppendorf tube, mix thoroughly, and subject it to sonication. Centrifuge at 12,000 g for 2 minutes at 4°C. Take a small amount of the supernatant for quantification. Adjust the concentration of all protein samples to an equal mass ratio, mix thoroughly until a precipitate forms, and then add loading buffer dropwise. If the sample can be loaded directly at this point, that is ideal; the remaining solution (dissolved in 1× loading buffer) can be stored at low temperature.
3. Tissues
For organ tissues such as the heart, liver, spleen, and kidneys, consider adding 1 mL of lysis buffer per 50 to 100 mg of tissue. For lung tissue, add 1 mL of lysis buffer per 100 to 200 mg, as appropriate. Homogenize the samples into a slurry either by manual stirring or using an electric homogenizer. When using a mixer, avoid prolonged mixing and maintain a low temperature; rapid, uniform mixing is essential for homogenization. Adjust the temperature of all mixed protein samples to a consistent level. After thoroughly heating and dissolving the protein precipitate, fill the tube with loading buffer and begin heating and stirring immediately until the loading concentration is optimal. Be sure to properly store any remaining protein solution at low temperature after processing.
(3) SDS-PAGE Electrophoresis
Once sample loading and verification are complete, add the electrophoresis buffer to the funnel in the electrophoresis chamber, connect the power supply, with the negative electrode at the top and the positive electrode solution at the bottom. During electrophoresis, the voltage for the concentrating gel is approximately 80 V, and the voltage for the separating gel is approximately 120 V. Continue the electrophoresis until the bromophenol blue band reaches the bottom of the electrophoresis lane, then stop.
(4) Membrane Transfer
1. Prepare the following in advance: transfer buffer, two small plastic clips for membrane transfer, two plastic sponge pads, a pipette, one PVDF transfer membrane, and two large sheets of filter paper. Wear disposable rubber gloves when cutting the filter paper and PVDF membrane. Before cutting, place the PVDF membrane in a solution of dilute methanol and soak it thoroughly for at least 5–10 seconds, then transfer it to the equilibration buffer to equilibrate.
2. Remove the SDS-PAGE gel, gently scrape the concentrated gel upward several times, and mark one corner of the gel to facilitate distinguishing the loading order. Place it in the transfer buffer bath to soak for about 5 minutes to rebalance the ionic strength.
3. Open the clamp and place it vertically in the center of the bottom black electrode chamber (cathode). Insert another black sponge spacer and use a second glass rod to tap back and forth several times to help evenly remove air bubbles. Remove all remaining gel that has been evenly soaked in the transfer buffer tank and lay it flat on the gel filter paper sheet, ensuring all residual air bubbles are eliminated. Place the PVDF transfer membrane onto the polyacrylamide transfer gel tray. Be sure to scrape and press the membrane back and forth with the glass rod several times to remove all air bubbles. Be sure to mark the top front edge of the transfer membrane tray (you can trim a corner of the membrane or mark the corner with a marker). First, cover the transfer membrane tray with another sheet of transparent filter paper that has been soaked and rinsed in the transfer membrane buffer solution, ensuring that no air bubbles remain inside the transfer membrane. Finally, place another sheet of transparent sponge padding on top of the tray, cover it with the anode plate cover (white), and clamp it securely to apply appropriate pressure to the gel layer.
4. Place the clamp into the transfer membrane tank; during the transfer process, the tank should be placed in a circulating ice-water bath. Typically, transfer is performed at a constant voltage of 110 V for approximately 60 minutes. Important note: Ensure the experiment is conducted at low temperature.
(V) Immunological Assay
1. Remove the membrane. Place one end of the membrane face-up in a container of 1x PBST solution and gently agitate it up and down for about five minutes. Wash three times, then transfer it to a bottle containing blocking solution (e.g., a PBST buffer solution bottle containing 10% skim milk powder concentrate) for storage; Weigh approximately 5 g of skim milk powder concentrate and 100 mL of PBST; dissolve thoroughly and store in a refrigerator at 4°C for no more than one hour. When retrieving the solution for use, allow the membrane to return to room temperature; use just enough solution to gently cover the membrane surface.) Place the membrane in a well-sealed glass dish and store it on a decolorizing shaker at room temperature for more than 1 hour.
2. Remove the membrane and wash it by shaking in a 1× PBST solution bath for approximately 5 minutes; repeat this three times. Place the membrane in a 1× PBST buffer bath (containing 5% skim milk) for incubation, while simultaneously adding the primary and secondary antibodies to the buffer baths, respectively, with a 60-minute incubation interval between additions.
3. Wash at least three times with 1× PBST, 5 minutes per wash.
4. Perform chemiluminescence detection and development.
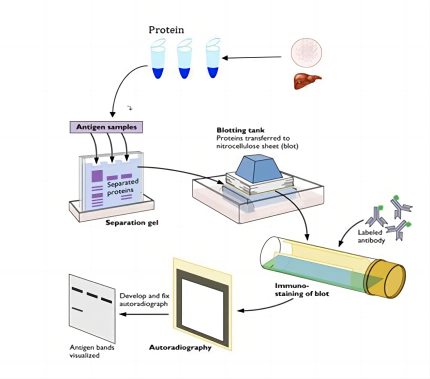
Figure 1: Basic Western Blot Procedure
KMD Bioscience excels at summarizing experimental details, maintains strict quality control points, and conducts rigorous preliminary experiments. We are able to tailor experimental protocols to each client’s specific samples and provide clear, comprehensive Western blot results, saving clients valuable research time and meeting their needs with high-quality service.
III. Comparison of Traditional Wet Blotting and Semi-Dry Blotting
Semi-dry blotting is suitable for proteins under 100 kDa and offers faster transfer rates. Since the current in semi-dry blotting does not leak sideways but remains entirely between the filter papers, the transfer efficiency is higher and the process is faster. The drawbacks are that the effective ion concentration declines rapidly, potentially leaving large proteins untransferred, and the high heat generation may cause the membrane to burn.
Wet blotting is suitable for large-molecule proteins above 100 kDa. Wet blotting has a lower effective current, which does not remain entirely between the filter papers but leaks into the buffer, resulting in lower efficiency and slower speed. However, the high effective ion concentration allows for prolonged blotting.
IV. Selection of Internal Control Antibodies
(I) Consider the Source of Experimental Samples
1. Mammalian tissue or cell samples: Common choices include β-actin, β-tubulin, GAPDH, Lamin B, Histone H3, and Na/K ATPase.
2. Plant-derived experimental samples: Options include plant actin and Rubisco.
3. Samples from other sources have been studied less frequently; appropriate antibodies should be selected by referring to published literature.
(II) Molecular Weight of the Target Protein:
Generally, the molecular weight difference between the target protein and the internal reference protein should be at least 5 kDa.
(III) Location of Target Protein Expression:
For experiments primarily aimed at accurately detecting specific proteins expressed intracellularly, antibodies against β-actin, β-tubulin, or GAPDH are sufficient; however, for the quantification of nuclear proteins—particularly when samples originate from nuclear proteins—commonly used nuclear reference antibodies include Lamin A, Lamin B, and Histone H3. In addition to these, other common nuclear reference proteins include PCNA, K70, and K80; in some published studies, Erk2, TATA-binding protein (TBP), as well as c-Jun and c-Fos, have also been used; For the detection of membrane proteins, the most commonly used internal control antibody is Na/K ATPase; for the detection of mitochondrial proteins, VDAC1 and COX IV are commonly used as internal control antibodies.
V. Applications of Western Blot Experiments
1. To investigate the subcellular localization of the target protein. Protein sorting, transport, and the ultimate expression of biological functions are the result of complex processes regulated by gene activity. Therefore, altering the activity of certain genes or introducing chemical modifications may affect the transport of their effector proteins, alter their distribution within the nucleus and cytoplasm, and trigger a series of different biological effects.
2. Studies on gene loss-of-function. After knocking down or overexpressing the target gene, Western blot (WB) technology is used to detect changes in the expression of proteins in related signaling pathways to determine how the target gene activates or inhibits the expression of the target protein and to investigate signaling pathways.
3. Detection of target protein expression in cells: By directly detecting key signaling pathway proteins—such as those involved in stem cell differentiation, autophagy, apoptosis, cyclin, DNA damage repair, and molecular diagnostic markers—via Western blot (WB) analysis, the biological state of cells or organisms can be assessed.
4. Studies on drug treatment and metabolism.
5. Protein interaction studies. Western blotting can be used to detect immunoprecipitation (IP) products from experiments such as Co-IP, RIP, and CHIRP, enabling the study of interactions between target proteins and other proteins, as well as between RNA and proteins.
KMD Bioscience’s Western blot service is now well-established. We adhere to a rigorous experimental approach and strict quality control standards, and can tailor experimental protocols to meet our clients’ specific needs.
- Induced Expression Analysis
- Purification and Characterization
- Western Blot

- Protein Platform
- Protein Expression Services
- Protein Modification & Detection Services
- Protein Interaction Services
- Protein Purification Service
- Antibody Discovery Platform
- VHH Antibody Platform
- Phage Display Platform
- Antibody Humanization Platform
- Single B Cell Screening Platform
- Antibody Expression & Validation Platform
- Peptide Library Platform
- Custom Antibody Platform
- Innovative Drug Discovery Platform
- Product Center
- Proteins
- Antibodies
- Raw Materials Reagents
- Small Molecule Reagents
- Peptide Products
- Nanoparticle Products
- Contact Us
- Phone:400-621-6806
- Mobile:13110936064(WeC
- E-mail:[email protected]
- Address:Room 108, Building 10, No. 6 Hechang Road, Wuqing Development Zone, Tianjin City
-

WeChat
-

Service Account
-
 400-621-6806
 -
 3599163699
 -
 Monday to Friday 9:00-18:00
 -

-
 0
0
-
